Data transfers - How to move data to / from nb-transfer.hpc.rug.nl
Firstly and independent of technical options: make sure you are familiar with the code of conduct / terms and conditions / license or whatever it is called and that you are allowed to upload/download a data set! When in doubt contact your supervisor / principal investigator and the group/institute that created the data set.
Instructions for external collaborators
For both macOS and Windows users who prefer a graphical user interface (GUI) we recommend FileZila. There are various other good and free SFTP clients, but note that not all SFTP clients support authentication with all types of SSH keys. Alternatively you can also use rsync on the commandline to transfer data. The rsync protocol is more efficient especially for resuming partially succeeded transfers, but unfortunately there are no good GUIs for rsync. See below for detailed instructions to transfer data with:
- FileZilla SFTP client app on Windows
- FileZilla SFTP client app on macOS
- rsync over SSH on the commandline
Transfer data with FileZilla SFTP client app on Windows
If you work in a restricted environment that does not allow you to install software yourself, then make sure you download the portable version that does not need to be installed (filename of the download on this page ends in .zip extension) as opposed to the FileZilla installer (filename of the download ends in .exe extension)
Start FileZilla
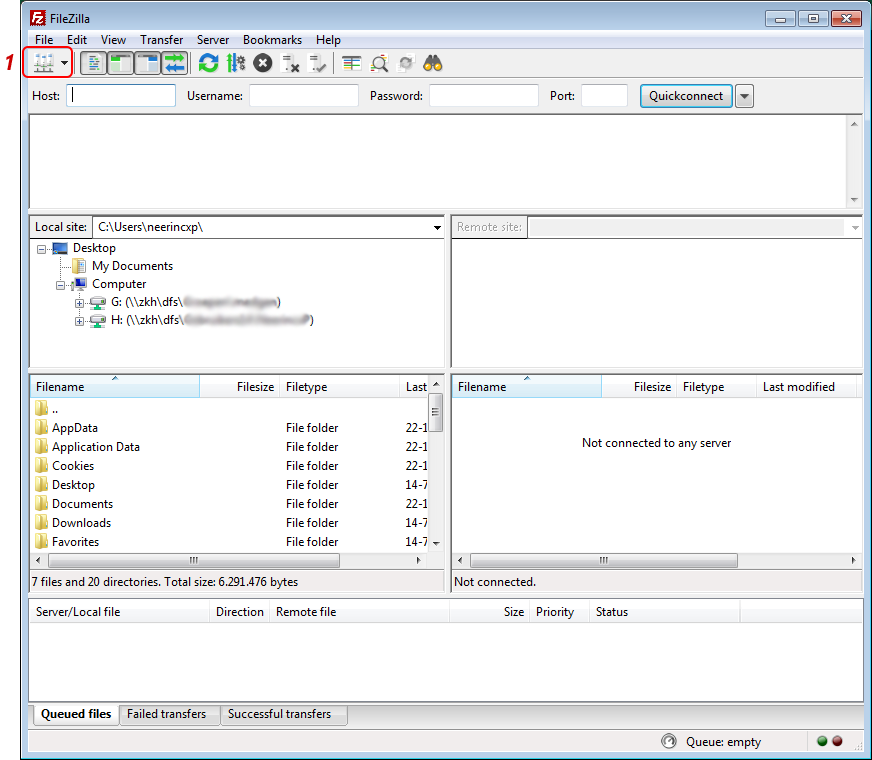
- 1: Click the Site Manager button to configure the connection to nb-transfer.hpc.rug.nl
Create new site with connection details for nb-transfer.hpc.rug.nl
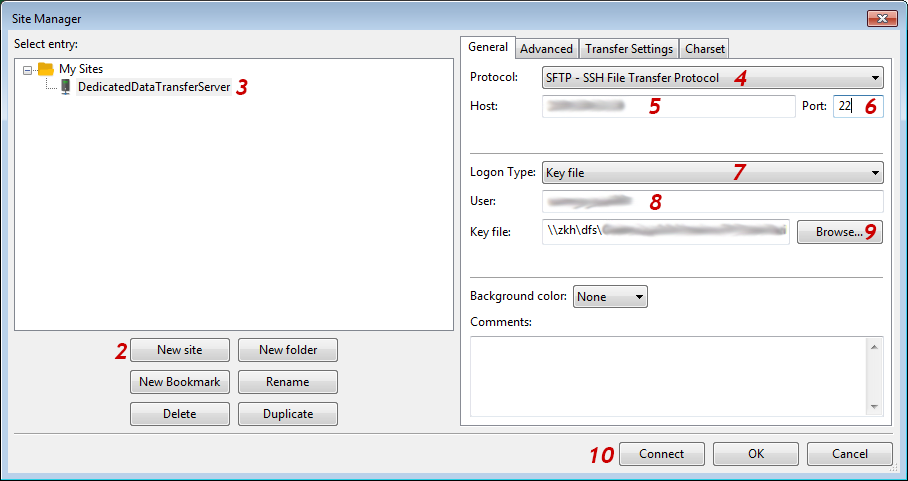
- 2: Click the New Site button.
- 3: Provide a name for the new site.
- 4: Select the SFTP protocol.
- 5: Enter the address nb-transfer.hpc.rug.nl in the Host field.
- 6: Use Port 22 (default).
- 7: Select Logon Type Key File.
- 8: Enter the guest accountname you received from the helpdesk in the User field.
- 9: Click the Browse button to select your private key.
- 10: Click the Connect button.
Remember passwords?
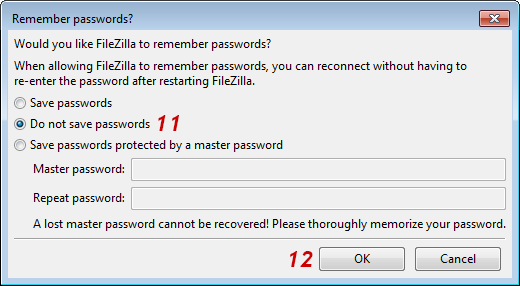
- 11: Select Do not save passwords.
- 12: Click the OK button.
Unknown host key
If this is the first time you connect to nb-transfer.hpc.rug.nl, FileZilla will show you the fingerprint of the server's host key.
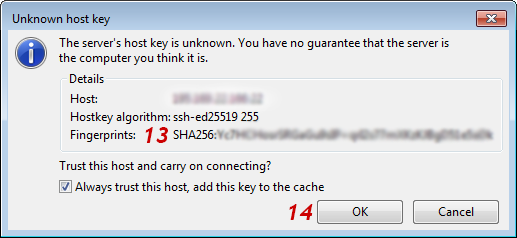
-
13: Verify if the shown fingerprint matches one of:
SHA256:r9PPmMJIISkvztYf3M6trMmvrhNqQQ/ZrYlj+tKkaLM (RSA)SHA256:yCge1vorqN5u0P1HO+bxx4uRC4FrGoIbjB7jThyVQmA (ED25519) -
14: Only if the fingerprint shown matches the expected fingerprint: click the OK button to continue.
Otherwise, if the fingerprint does not match, click the Cancel button and contact our helpdesk.
Password for the private key
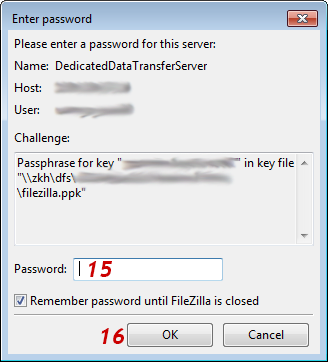
- 15: Provide the password for the private key. (You chose this password yourself when you created your key pair.)
- 16: Click the OK button.
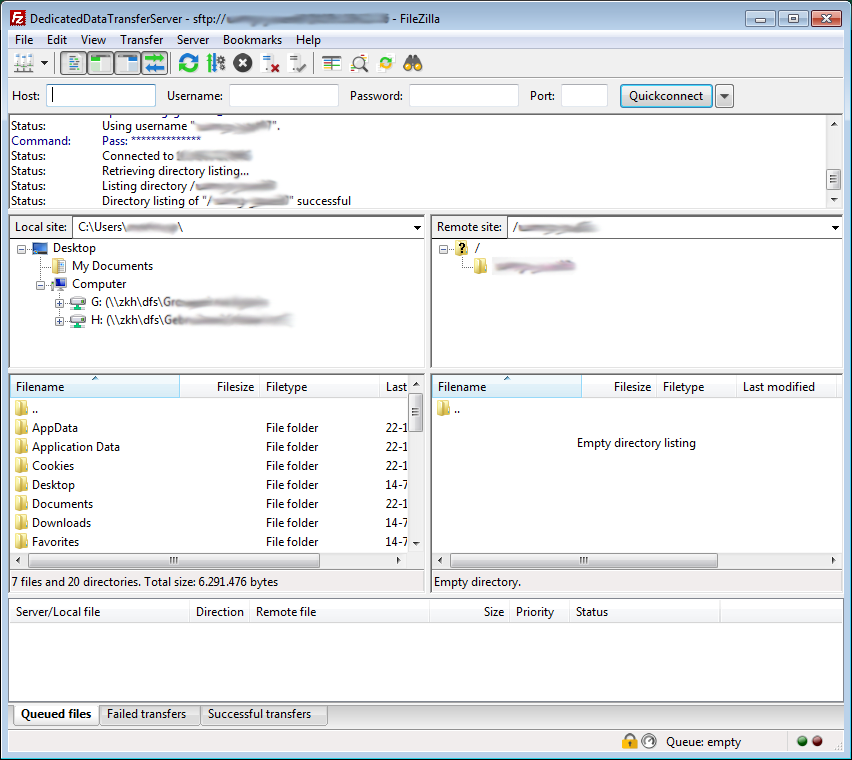
Drag and drop files or folders to start a transfer
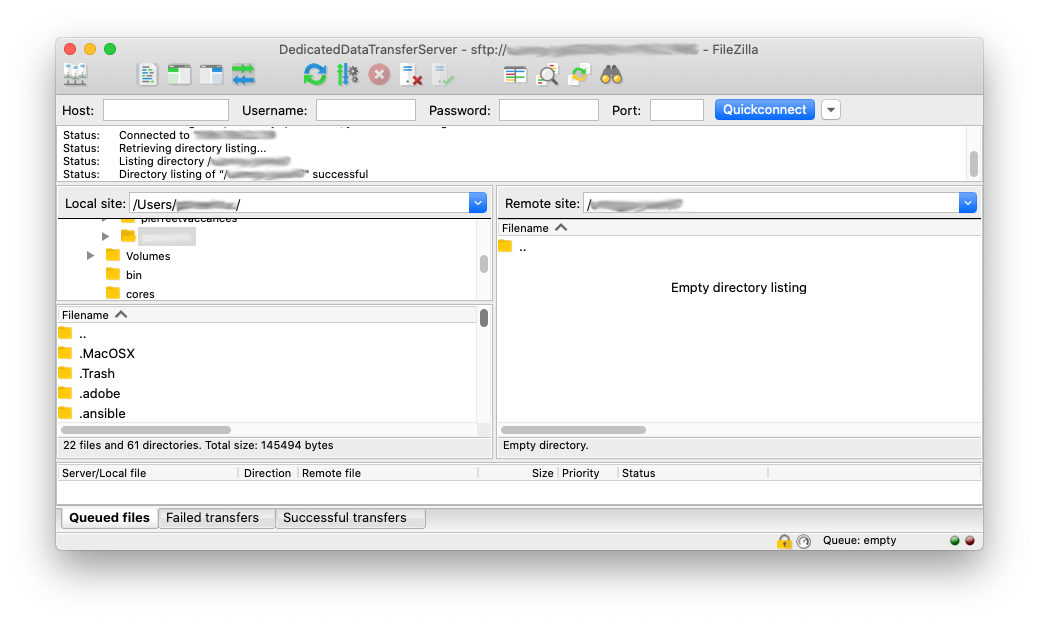
FileZilla will login and start a session. You can browse files/folders on your local machine in the left column and on nb-transfer.hpc.rug.nl in the right column. Drag files/folder from the left column to the right one to upload or vice versa to download.
Transfer data with FileZilla SFTP client app on macOS
Start FileZilla
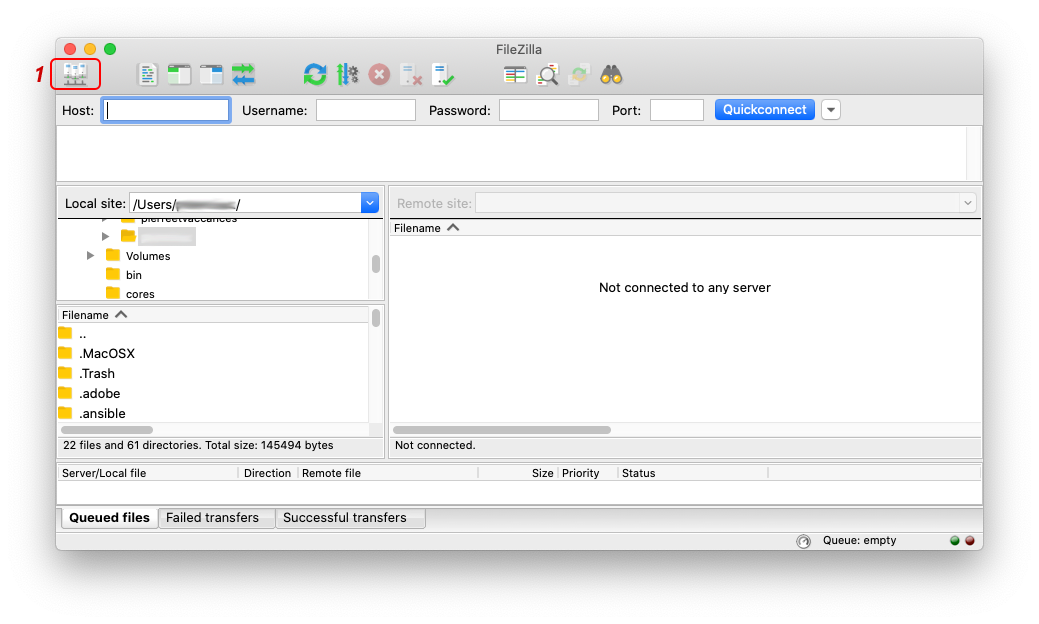
- 1: Click the Site Manager button to configure the connection to nb-transfer.hpc.rug.nl
Create new site with connection details for nb-transfer.hpc.rug.nl
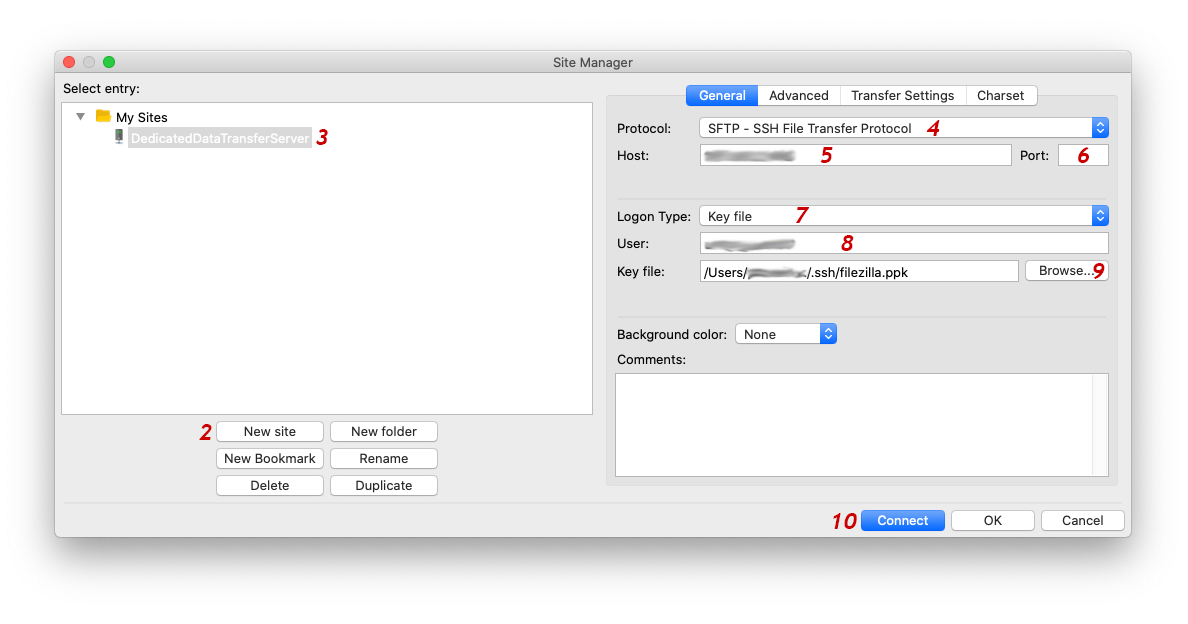
- 2: Click the New Site button.
- 3: Provide a name for the new site.
- 4: Select the SFTP protocol.
- 5: Enter the address nb-transfer.hpc.rug.nl in the Host field.
- 6: Use Port 22 (default).
- 7: Select Logon Type Key File.
- 8: Enter the guest accountname you received from the helpdesk in the User field.
- 9: Click the Browse button to select your private key. Note: if your private key was stored in a hidden folder (folder name starts with a dot), you can press [SHIFT]+[.] to show hidden files and folders in dialog windows.
- 10: Click the Connect button.
Convert key file
FileZilla stores private keys in PuTTY Private Key file format (.ppk). It cannot use private keys in OpenSSH format, but can convert a private key generated with OpenSSH into a .ppk file.
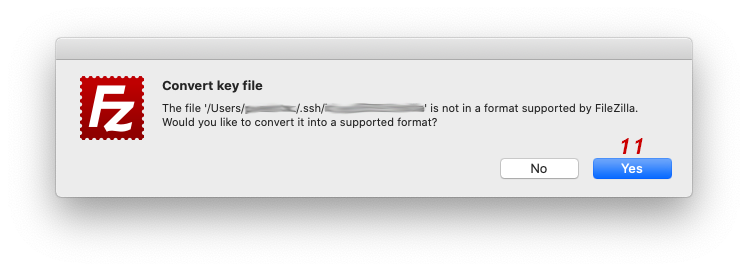
- 11: Click the Yes button.
Password for the private key
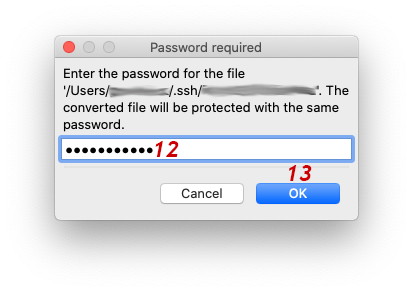
- 12: Provide the password for the private key. (You chose this password yourself when you created your key pair.)
- 13: Click the OK button.
Select filename for converted key file
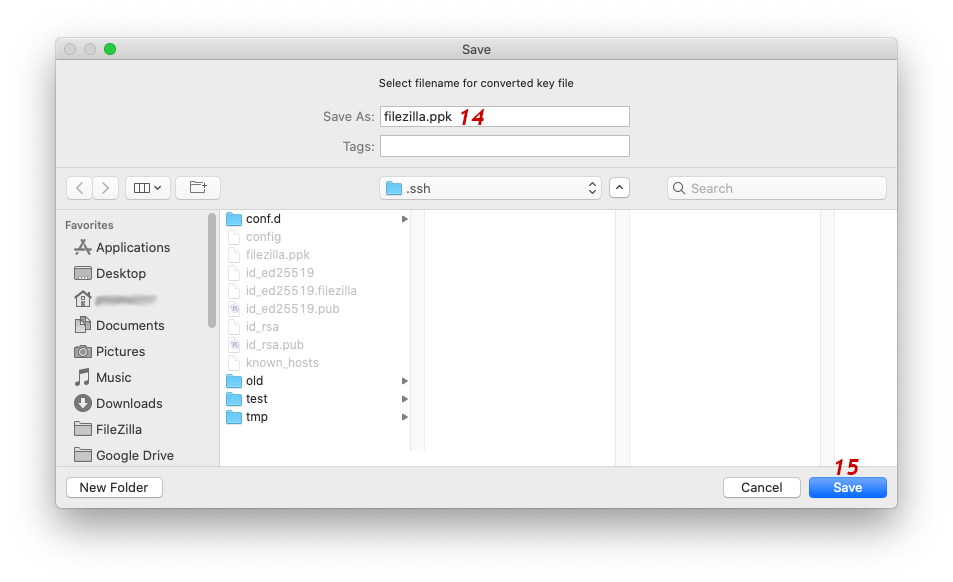
- 14: Provide a new name for the converted private key. (Hence, do not overwrite the existing private key file.)
- 15: Click the Save button.
Remember passwords?
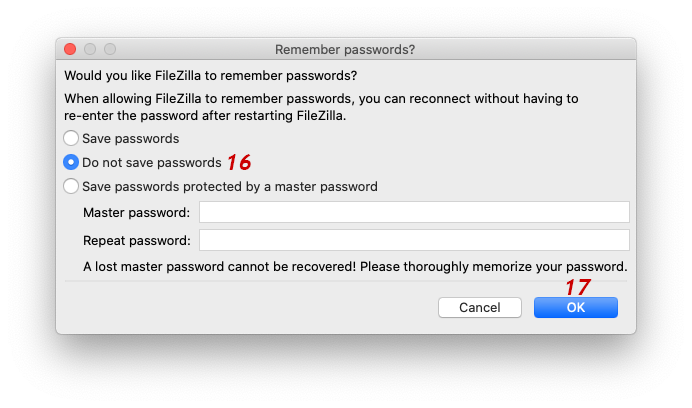
- 16: Select Do not save passwords.
- 17: Click the OK button.
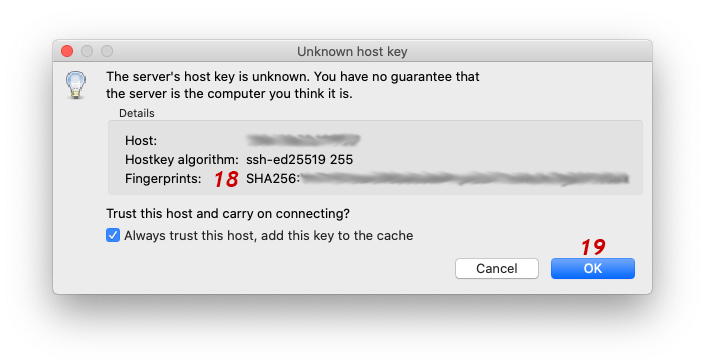
Unknown host key
If this is the first time you connect to nb-transfer.hpc.rug.nl, FileZilla will show you the fingerprint of the server's host key.
-
18: Verify if the shown fingerprint matches one of:
SHA256:r9PPmMJIISkvztYf3M6trMmvrhNqQQ/ZrYlj+tKkaLM (RSA)SHA256:yCge1vorqN5u0P1HO+bxx4uRC4FrGoIbjB7jThyVQmA (ED25519) -
19: Only if the fingerprint shown matches the expected fingerprint: click the OK button to continue.
Otherwise, if the fingerprint does not match, click the Cancel button and contact our helpdesk.
Drag and drop files or folders to start a transfer
FileZilla will login and start a session. You can browse files/folders on your local machine in the left column and on nb-transfer.hpc.rug.nl in the right column. Drag files/folder from the left column to the right one to upload or vice versa to download.
Transfer data with rsync over SSH on the commandline
You can use rsync (over ssh) to transfer data to/from nb-transfer.hpc.rug.nl. Note that the data transfer uses rsync modules, which uses double colon syntax (::) to separate the name/address of the server from the path on the server. The rsync protocol is more efficient for large data sets and easier to automate, but unfortunately there are no free and good rsync client apps with a Graphical User Interface (GUI). See below for some syntax examples.
#
##
### Specify only source and leave a destination out to get a listing of modules, files and folders available on the source side.
##
#
# Request a list of rsync modules available for user some-guest-account.
#
rsync -v --rsh='ssh -p 443 -l some-guest-account' nb-transfer.hpc.rug.nl::
#
# List contents in the home module.
#
rsync -v --rsh='ssh -p 443 -l some-guest-account' nb-transfer.hpc.rug.nl::home/
#
##
### Specify both a source as well as a destination to transfer data.
##
#
# Push a file from user interface to data transfer server.
#
rsync -av --rsh='ssh -p 443 -l some-guest-account' path/to/file_on_local_computer nb-transfer.hpc.rug.nl::home/
#
# Reverse source and destination to pull a file from data transfer server onto user interface server.
#
rsync -av --rsh='ssh -p 443 -l some-guest-account' nb-transfer.hpc.rug.nl::home/data_on_transfer_server path/to/dir_on_local_computer/