Jupyter - How to use Jupyter in your local web browser to crunch data on Fender
Introduction
The Jupyter project provides a collection of tools for interactive computing across various programming languages.
JupyterLab is one of the project's most well known products and the latest web-based, interactive development environment for Jupyter notebooks, code, and data. The documentation below explains how to create and connect to a JupyterLab session on Fender. For documentation on how to use JupyterLab itself see https://jupyterlab.readthedocs.io
How to use JupyterLab

You can use Jupyter by:
- Running a
jupyter labsession on Fender. - Creating an SSH tunnel from your local computer to the Fender compute node where that Jupyter session is running.
- Starting a web browser on your local computer to work with the Jupyter session via the SSH tunnel.
This setup will ensure:
- The original data sets can stay on Fender
- Communication between your local client computer and Fender is encrypted via the SSH protocol.
- Code to crunch data can be written on your local client and will be send to Fender for analysis of the data sets.
- Result files can also stay on Fender.
0. Install software on your own computer
You only need a web browser and an SSH client, which you most likely already have by the time your read this documentation. There is no need to install any Jupyter components locally.
1. Login on Fender
Login on Fender with your SSH client
2. Create a screen or tmux session on Fender
Optionally start a screen or tmux session.
Working with screen or tmux is beyond the scope of this documentation, but highly recommended.
It allows you to disconnect from Fender while leaving your session running,
so you can re-login and re-connect later.
Without screen or tmux a dropped network connection will result in loosing the session and loosing any unsaved work in it.
There is a good article How to Use Linux’s screen Command on the How-To Geek website.
Use the -S argument to give your screen session a name. E.g. to create one named jupyter:
screen -S jupyter
3. Create an interactive Slurm session on Fender
See Crunch - How to manage jobs on Fender for details.
Simple example requesting a single core and 1 GB RAM memory for max one hour:
srun --cpus-per-task=1 --mem=1gb --nodes=1 --qos=interactive --time=01:00:00 --pty bash -i
hostname
The hostname command will report the name of the compute node where your interactive Slurm session is running;
You will need this name later on when creating the SSH tunnel...
4. Load and start Jupyter in your interactive Slurm session on Fender
module load JupyterLab
jupyter lab --no-browser
Jupyter will now create a session and report
- which port it selected
- the secret / cookie it generated to secure the session
- the URL you can use locally to access your Jupyter sessio on Fender
E.g.:
[I 2023-05-23 17:19:18.578 ServerApp] jupyterlab | extension was successfully linked.
[I 2023-05-23 17:19:18.590 ServerApp] nbclassic | extension was successfully linked.
[I 2023-05-23 17:19:18.599 ServerApp] Writing Jupyter server cookie secret to /home/*******/.local/share/jupyter/runtime/jupyter_cookie_secret
[I 2023-05-23 17:19:25.788 ServerApp] notebook_shim | extension was successfully linked.
[I 2023-05-23 17:19:26.141 ServerApp] notebook_shim | extension was successfully loaded.
[I 2023-05-23 17:19:26.142 LabApp] JupyterLab extension loaded from /apps/software/JupyterLab/3.5.0-GCCcore-11.3.0/lib/python3.10/site-packages/jupyterlab
[I 2023-05-23 17:19:26.142 LabApp] JupyterLab application directory is /apps/software/JupyterLab/3.5.0-GCCcore-11.3.0/share/jupyter/lab
[I 2023-05-23 17:19:26.148 ServerApp] jupyterlab | extension was successfully loaded.
[I 2023-05-23 17:19:26.232 ServerApp] nbclassic | extension was successfully loaded.
[I 2023-05-23 17:19:26.233 ServerApp] Serving notebooks from local directory: /path/to/dir/from/where/jupyter/was/started/
[I 2023-05-23 17:19:26.233 ServerApp] Jupyter Server 1.21.0 is running at:
[I 2023-05-23 17:19:26.233 ServerApp]     http://localhost:8888/lab?token=b23e4350********************************db01a09e
[I 2023-05-23 17:19:26.233 ServerApp]  or http://127.0.0.1:8888/lab?token=b23e4350********************************db01a09e
[I 2023-05-23 17:19:26.233 ServerApp] Use Control-C to stop this server and shut down all kernels (twice to skip confirmation).
[C 2023-05-23 17:19:26.257 ServerApp]

    To access the server, open this file in a browser:
        file:///home/*******/.local/share/jupyter/runtime/jpserver-16777-open.html
    Or copy and paste one of these URLs:
        http://localhost:8888/lab?token=b23e4350********************************db01a09e
     or http://127.0.0.1:8888/lab?token=b23e4350********************************db01a09e
Each session needs its own unique port and jupyter lab automatically selected one that is free.
You will need this port number later on when creating the SSH tunnel.
Once the SSH tunnel is established you can user either of the URLs in a web browser on your local computer.
Keep the token safe and treat it like a password to prevent others from hijacking your Jupyter session.
Optionally in case you are running this inside screen:
Now press CTRL+a followed by CTRL+d to detach from the screen.
The jupyter lab session inside the interactive Slurm job inside the screen session will continue to run in the background.
You can reconnect to the existing screen session using -r argument and the name of the screen session.
E.g.:
screen -r jupyter
5. Create an SSH tunnel on your own computer
Now we need to create an SSH tunnel from your local client computer to the server and connect to the remote R session.
For Windows clients
The instructions below we assume you use MobaXterm to connect to Fender as described in SSH config and login to UI via Jumphost for users on Windows.
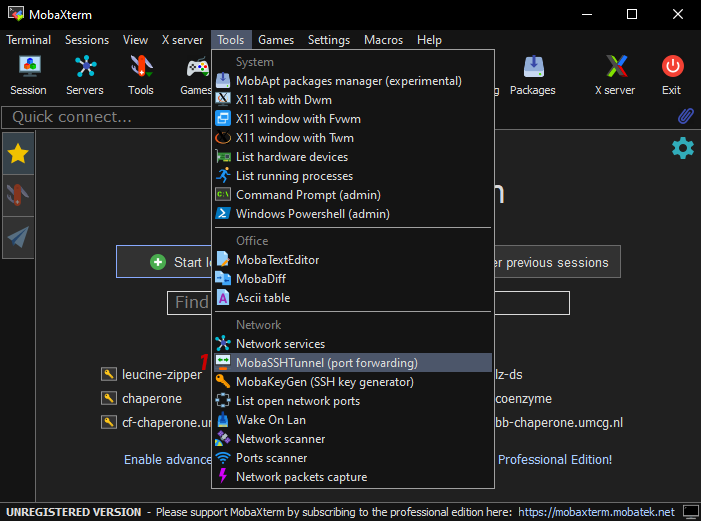
- 1: Select MobaSSHTunnel from the Tools menu.
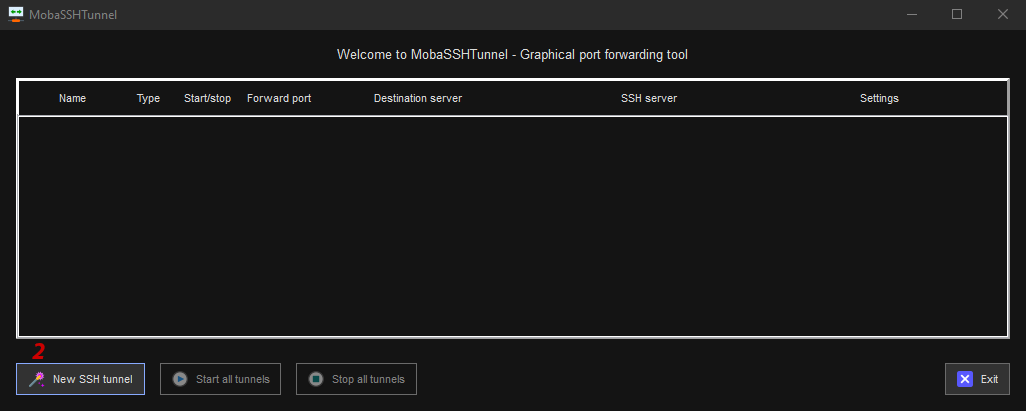
- 2: Click the New SSH tunnel button.
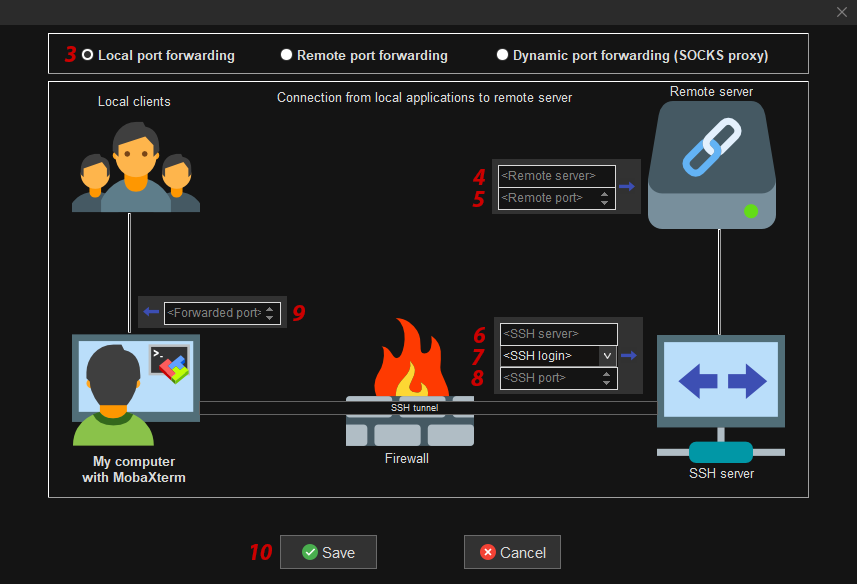
- In the popup window fill in / select:
- 3: Local port forwarding
- 4: Remote server field: The hostname of the compute node where
jupyter labis running. - 5: Remote port field: The port number chosen by
jupyter labon the server side. - 6: SSH server field: Use jumphost address 45.88.81.213.
- 7: SSH login field: Use your account name as you received it by email from the helpdesk.
- 8: SSH port field: 22
- 9: Forwarded port field: The port number you chose on the client side.
For the Forwarded port you have to chose a free port yourself. Hence, it must be a port that is not yet used by another process. We suggest you simply try to use the same number as the one thatjupyter labselected on the server side. If that one does not work because it is already taken, simply increment by one and retry until you found one that is free. - 10: Click the Save button.
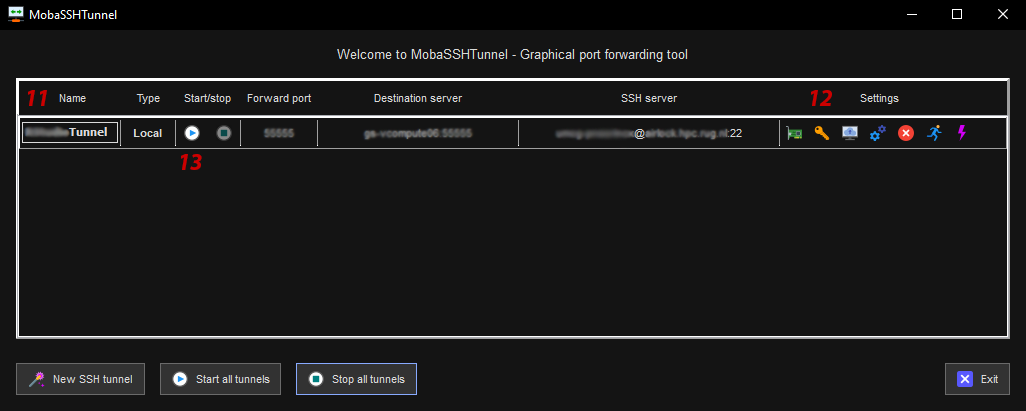
- 11: Give the tunnel config a name.
- 12: Click the key icon to select your private key file.
- 13: Click the play button to start the SSH tunnel.
For Linux & macOS clients
Use the ssh command in a terminal to create an SSH tunnel from your local machine via jumphost corridor
to the Fender compute node on which jupyter lab is running in your interactive Slurm session.
The general syntax is:
ssh -N -L localhost:<port_number_on_client>:localhost:<port_number_on_server> corridor+<hostname_of_jupyter_server>
The example below uses the same port number on the client side as the one chosen by jupyter lab
running on Fender compute node fd-vcompute01.
ssh -N -L localhost:8888:localhost:8888 corridor+fd-vcompute01
If you get a message like this:
bind [127.0.0.1]:8888: Address already in use
channel_setup_fwd_listener_tcpip: cannot listen to port: 8888
Could not request local forwarding.
then the selected port on the client side is not free and already used by another process. Try the next port number until you find one that is free: in that case you will not get any message. E.g.:
ssh -N -L localhost:8889:localhost:8888 corridor+fd-vcompute01
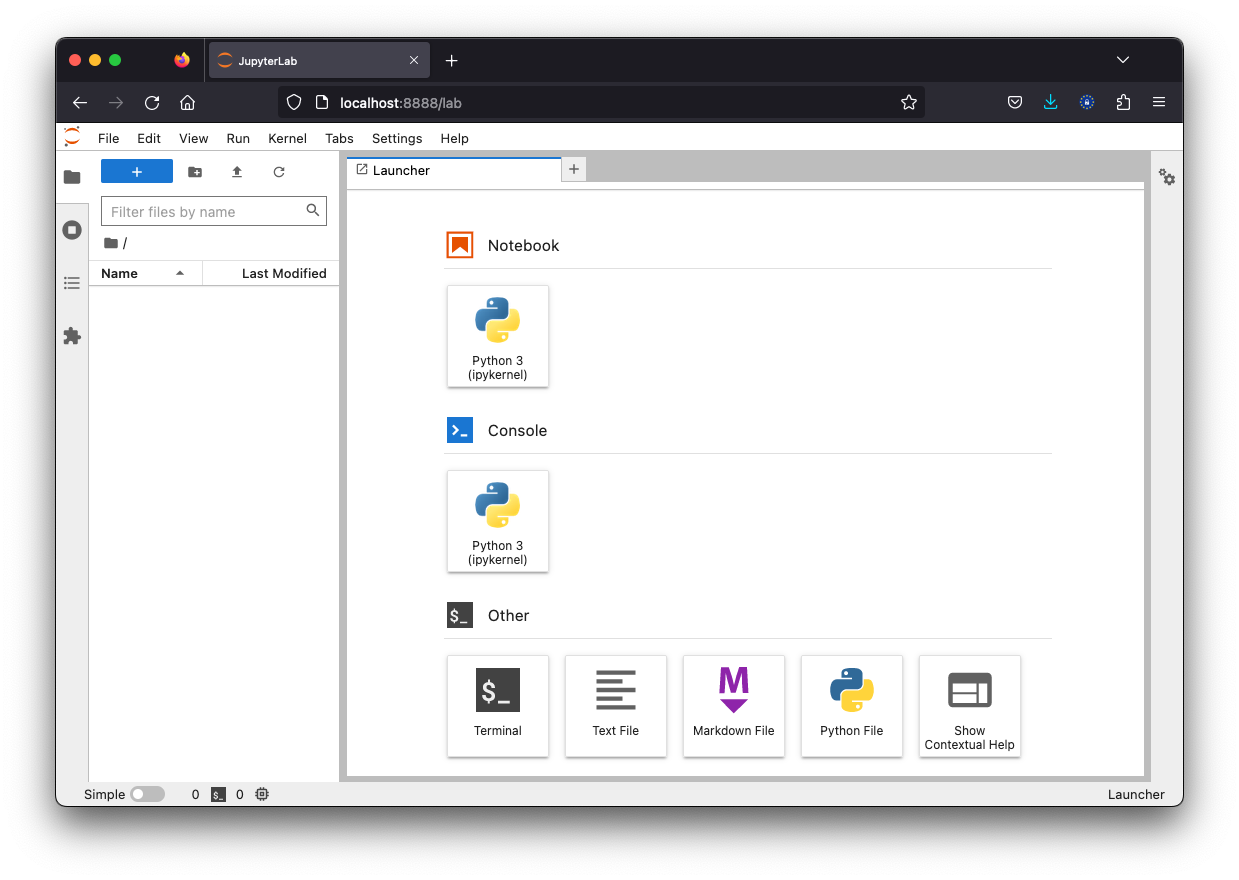
6. Using the Jupyter session in a web browser on your own computer
You can now connect to the remote Jupyter session simply by pasting the URL in a web browser on your own computer.
Make to paste the complete URL including the generated session token (e.g. http://localhost:8888/lab?token=b23e4350********************************db01a09e) in the address bar.
Depending on the web browser used the token may be hidden from the address bar once you hit the [ENTER] key.
7. Cleaning up
Don’t keep Jupyter running forever on Fender! Make sure to really exit your session on Fender when you are done to prevent wasting resources, which is not nice for others waiting in the queue.
- Without
screen:
PressCTRL+cand answeryto quit thejupyter labsession. Next, typeexitorCTRL+xto exit your interactive Slurm job. - With
screen:
First re-attach to your screen session if you were detached. Now, pressCTRL+cand answeryto quit thejupyter labsession. Next, typeexitorCTRL+xto exitscreenand anotherexitorCTRL+xto exit your interactive Slurm job.
Shutdown this Jupyter server (y/[n])? y
[C 2023-05-23 18:07:34.005 ServerApp] Shutdown confirmed
[I 2023-05-23 18:07:34.008 ServerApp] Shutting down 3 extensions
[I 2023-05-23 18:07:34.008 ServerApp] Shutting down 0 terminals